

Writing an SEO-friendly article begins with understanding what the reader needs to accomplish. That question guides the evidence you gather, the way you organize the answer, and the draft itself. Titles, images, and links come after the substance is clear. Working in this order gives each section a purpose beyond satisfying a checklist.
This guide follows one example: how to choose a notebook for work, written for a stationery website. You will see how a broad keyword becomes a brief, how an unfocused outline improves, and how advice becomes specific enough to use. Mạch Nội Dung created the example for illustration; it does not describe a particular customer or product.
The five steps are to clarify the reader’s question, check sources and unknowns, outline the answer around the decision, write with concrete examples, and review the content, SEO fields, and displayed page.
What should an SEO-friendly article achieve?
In practical editorial terms, it should answer a search need with sufficiently reliable information and make its subject clear to readers and search engines. Before writing, ask: who does this help, what will it help them do, and what supports the advice?
Google’s people-first content guidance encourages useful information with a clear purpose and reliable grounding. Google does not specify a preferred word count. Length should follow the task, not a fixed target.
A reader choosing a notebook may need a way to test alternatives. A history of papermaking may add little to that decision. Yet omitting whether the reader writes lists or sketches diagrams would leave a real gap, even in an article with plenty of headings.
1. Define the question and the scope
Use the keyword as a starting point for understanding the need
Write the main question in everyday language. “How to choose a notebook for work” could mean: “I need to record tasks and meeting notes. Which notebook will be comfortable to use, easy to carry, and easy to review?” That is more useful than “write about notebooks.”
Next, search the main phrase and a few related phrasings. Read relevant results to see whether people seem to want instructions, comparisons, or a specific product. Note the types of pages, the questions answered, and the remaining gaps. Search results are one source of observation; compare them with actual customer questions and information the business can provide.
- “How to choose a notebook for work”: the initial hypothesis is that the reader needs criteria and a practical test. A guide may fit.
- “Dotted vs. ruled notebooks”: the question focuses on page-layout differences.
- “Buy an A5 hardcover notebook”: the reader may need products, specifications, and prices. Inspect actual results before choosing an informational article.
When results reflect several needs, explicitly choose the task your article will complete. Trying to teach, compare prices, and locate a product code at once often makes the introduction unfocused.
Write a brief you can use while editing
- Reader: someone choosing a notebook for everyday work who is unsure which criteria matter.
- Outcome: identify their note-taking style, test a suitable size, and know what to check before buying.
- Main answer: start with actual use, then select size and page layout and check the writing experience of the specific model.
- Scope: selection advice, without unverified brand rankings, price comparisons, or product recommendations.
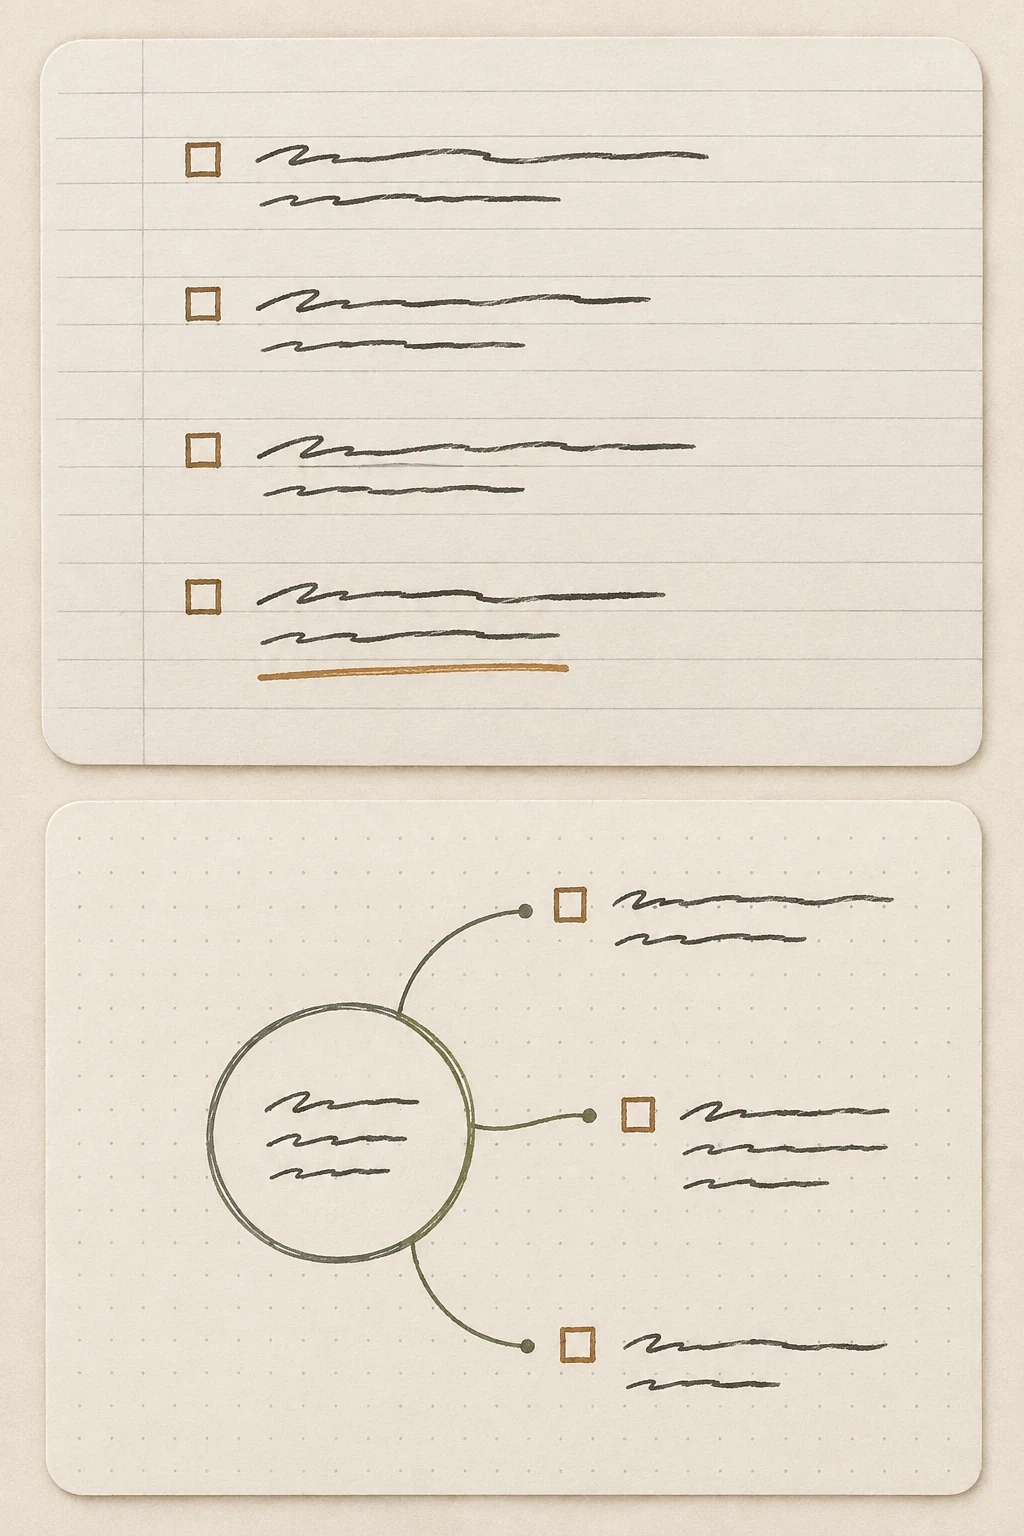
- Required example: the same meeting note tried on ruled and dotted paper.
- Required image: two arrangements of the same note; any product-performance test needs real photographs and disclosed test conditions.
Before creating a URL, check whether an existing page already serves this task. If a notebook-selection guide only lacks a page-layout test, improve that article. A slightly different title does not establish a different reader need.
2. Choose sources and mark what you do not know
A convincing article distinguishes facts from recommendations. Facts should be verifiable; recommendations should explain when they apply. Without that distinction, a writer may claim a notebook suits every pen without ever handling it.
For this example, organize material into three groups:
- Product information: dimensions, page count, page style, and cover material. Verify the exact product code against manufacturer documentation or seller-confirmed records and note the date checked.
- Use observations: opening the notebook, writing in it, and inspecting the reverse of the page. Record the model, pen, and actions tested. One sample photograph does not represent every similar-looking notebook.
- Editorial suggestions: copying the same work note onto two layouts and comparing how easy each is to review. This is a proposed self-assessment method, not a specification or laboratory result.
Flag unsupported details in the draft. Before readers see it, resolve each flag by finding an appropriate source, narrowing the claim, or removing it. If the paper has not been tested, explain how to check it with a familiar pen rather than declaring it smudge-proof or bleed-proof.
Place source links near the facts they support and point to the relevant document or page. Explain the reasoning and conditions behind your own recommendations so readers can distinguish verified information from advice.
3. Outline the article in the order readers make decisions
Read the headings on their own. Do they create a logical route from question to decision?
Before: a topic list without a practical path
- What is a notebook?
- The history of notebooks
- Benefits of using a notebook at work
- Popular notebook types
- The best notebooks
- Conclusion
This outline names the right object but devotes much of its space to background. Someone ready to choose must wait for useful guidance. “Types” does not explain how categories help the decision, while “best” requires criteria and comparative evidence absent from the brief.
After: each section resolves a specific obstacle
- What do you write, and do you carry your notebook daily?
- Test the size using a real note
- Choose ruled, dotted, or blank pages around your writing style
- Check the paper and how the particular notebook opens
- Make the final choice against your must-have requirements
The revised outline keeps the useful categories but ties them to use. It puts the reader’s habits first, because a list writer and a diagram maker may assess layouts differently. It removes history that does not help this decision and drops a “best” list without adequate comparison material.
In the working outline, add two notes below every section: what the reader will be able to do and what evidence or example is needed. A layout section needs two versions of the same note. A paper-quality section needs a test procedure or genuine test photographs. If a section has no separate answer or evidence, check whether it repeats its neighbor.
Use H2 headings for major sections and H3 headings for meaningful subdivisions. For example, page-layout selection could be an H2, with different note-taking situations as H3s. Do not use headings simply to enlarge an emphasized sentence.
4. Draft direct answers and concrete examples
Make the opening immediately useful
Explain the main approach and scope at the start. A long introduction about modern life does not help someone choose a notebook. Begin with an action: take a recent work note, inspect what you wrote, and use that material to test layouts.
Each paragraph should offer a choice, explain when it fits, and give an example or check. “Choose a suitable size” leaves the reader to work out how. Adding a step such as checking the notebook against the bag compartment they use makes the advice actionable.
Short example article: how to choose a notebook for work
Start with what you actually write during the day. Take a meeting note, a to-do list, or a diagram you have used. It provides a more realistic way to test size and layout than judging a notebook by its cover.
Write down two requirements first. Do you mostly write in lines, or do you need space to connect ideas? Will the notebook stay on your desk or travel with you? If you carry it to meetings, consider the bag compartment and the other items it must fit beside. A notebook that fits comfortably on a desk may be awkward in your bag.
Test the page size with real content. Find the manufacturer’s dimensions for the notebook under consideration and mark the corresponding writing area on a sheet of paper. Copy your chosen note. Do you have to write smaller than usual? Are ideas crowded together? Is there room to add actions? This test helps you picture the writing area; check thickness and weight separately on the actual notebook.
Choose a layout around how you review notes. If you prefer line-by-line writing, try ruled paper. If you combine lists and diagrams, try dotted or blank pages. Use the same content for each test, close it, and reopen it to locate an action. A layout that lets you find information easily without changing your natural writing style deserves consideration.
Check what a cover photograph cannot tell you. If you have permission to test a sample, use your usual pen, let the ink dry, and inspect both sides of the page. Open the notebook near the beginning, middle, and end to judge the writing position. When buying online without a sample, ask for missing information rather than guessing from photographs.
Finally, write down the requirements that must be met: fitting your bag, providing enough space for a note, and making information easy to find again. Compare each candidate with that list before considering cover color or decorative details. Your choice will have a clear rationale.
Why this goes beyond a list of tips
The example gives readers actual tests. It distinguishes writing area from thickness and weight, compares layouts with the same content, and identifies properties a cover photograph cannot reveal.
When editing your own article, find words such as “suitable,” “quality,” “effective,” and “convenient.” Ask: for whom, for what task, and recognizable by what evidence? The answers often supply the missing detail.
Recognize when the article is complete
Return to the brief and try to follow the instructions. Can the reader now do what the opening promised? Add detail where a step remains difficult.
A guide to archiving a notebook after a year might be useful, but it may not help today’s buying decision. It could become a separate article on managing notes. Clear boundaries preserve the current article’s focus and reduce repetition later.
5. Finish the metadata, images, links, and preview
Match the title and description to the article you actually wrote
Finalize the title after the content is clear. “How to Choose a Notebook for Work” matches the sample. Adding “best” or “double your productivity” would promise something the article has not demonstrated.
Google recommends descriptive, concise titles without repeated keywords. Search-result titles can draw on several sources on the page, and no fixed character count guarantees full display.
Distinguish three CMS fields:
- Article title: the name readers see on the page.
- SEO title: the page title supplied for the page and search engines; it should share the article title’s central meaning.
- SEO description: a short summary of what the page helps readers do.
An example description: “Choose a work notebook around your writing style, page size, and layout. Try a real note and check the details that matter before buying.”
Google primarily creates snippets from page content and sometimes uses the meta description, so the displayed text may differ. Also check the separate excerpt shown in your site’s article list.
Use a short, understandable slug that matches the topic. Include the main phrase where natural, such as in the title and introduction. If a repeated phrase sounds awkward aloud, rewrite it. Every H2 does not need the full keyword.
Give images a job and links a reason
A cover image identifies the topic. In the layout section, two versions of the same note explain the choice more effectively than generic stationery imagery.
Google’s image guidance recommends relevant surrounding text, descriptive filenames, and useful alt text. Describe what matters in the final image without stuffing keywords. An appropriate description might identify the same meeting note on ruled and dotted pages, provided that is what the image actually shows.
Illustrations can explain layout; product properties such as ink bleed need real tests with clear conditions. After compression or resizing, inspect text and detail at a phone-sized width. Choose settings for the actual image instead of forcing every file to the same size.
Add links where the reader encounters a useful next question. A notebook guide might link to an existing explanation of product dimensions. If that page does not exist, explain the essentials in place and add the link only when its destination is ready.
Google’s link guidance favors concise, descriptive anchor text in context. Readers should have a reasonable idea of the destination from the linked words. Open the link to verify it rather than assuming colored text means it works.
If you use AI, check facts as carefully as wording
AI can suggest missing questions, alternative phrasing, or repeated ideas. Supply the brief and checked sources, and ask it to flag missing facts. Keep only material you have reviewed.
Google’s guidance on generative AI content emphasizes accuracy, including titles, descriptions, and alt text. Producing many pages without added value can violate spam policies.
Read the saved preview as a first-time visitor
Save a draft and open the preview on desktop and mobile. The editor alone will not reveal awkward wrapping, cropped images, or incorrect destinations.
- Answer: the opening states the task, and every section contributes a necessary step or explanation.
- Facts: specifications and claims are supported, hypothetical examples are identified, and no unresolved verification notes remain.
- Text and images: images are relevant and authorized, alt text is accurate, image text is readable, and paragraphs work on small screens.
- Metadata and links: title, description, and slug match the article; links reach existing pages; no promise exceeds the content.
- Status: the correct draft is saved and reopened, with publication reserved for the approved version.
For the notebook example, try following the guide with an old note, your usual pen, and information about a candidate notebook. If it is still unclear how to begin, fix the instructions before polishing more sentences.
A repeatable SEO-writing process gives every editorial choice a reason: the question defines the scope, sources determine what can be claimed, the outline orders the explanation, examples make advice practical, and the preview shows how the page works. Mạch Nội Dung’s website content care can support that process when you need help implementing it.
Before writing, you can collect reader questions from customer conversations. When the draft is complete, check that its SEO title and description make a promise the page delivers.